Shade is a dark color that can block light from reaching something. It can also refer to the varying degrees of darkness of a particular color.
Cellular shades use honeycomb-like pockets to insulate windows by keeping warm air in during winter and hot air out during summer. They also provide excellent light control and energy efficiency, while offering a sleek and modern look. Visit https://www.customblindsandshadesky.com/ to learn more.
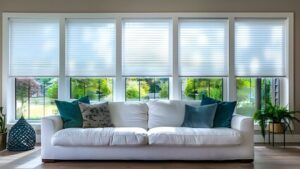
Light filtering window treatments can enhance a space by transforming harsh sunlight into a soft glow and decreasing the need for artificial lighting. They also reduce glare and protect furnishings, flooring, artwork, and other valuable possessions from the sun’s harmful UV rays. Many fabric types offer varying degrees of light-filtering capabilities, including sheers and honeycomb shades. Pleated shades, in particular, are ideal for larger windows and can help conceal blinds, making them an excellent option if you’re worried about privacy.
The amount of light-filtering capability a fabric has depends on its openness factor, weave pattern, and color density. In general, lighter colors and looser weaves allow more light into a room than darker colors and denser fabrics. However, some fabric styles can feature an optional light-blocking liner, which transforms the shade into a blackout window treatment and offers enhanced privacy.
If you’re looking for the best light control, consider our pleated and cellular shades. These window coverings are perfect for larger windows and oddly shaped windows such as arches, angled tops, and skylights. Their wide range of fabric options gives you a variety of textures and light-filtering capabilities, while their thicker linings block out more UV rays and infrared radiation.
Some light-filtering window treatments even have the ability to redirect incoming sunlight. For example, Pirouette and Silhouette window shadings use vanes to redirect light and can be positioned to create a custom look.
While light-filtering curtains and shades provide an array of benefits, sometimes a room requires total darkness to achieve the desired ambiance. This is particularly true for bedrooms, where darkening the room can improve sleep quality and prevent sleep disorders.
Fortunately, you don’t have to choose between a bedroom that’s cozy and comfortable or a well-rested one. Hunter Douglas’s innovative Duolite operating system allows you to customize a single shade with two separate fabric opacities. The top shade features a light filtering opacity, while the bottom features a room-darkening opacity. Together, they can be seamlessly adjusted for the right level of light and darkness.
Privacy Options
If privacy is a concern, consider the options that can prevent people from seeing into your home. Light filtering shades and sheer curtains are an affordable way to block out the light, and they can also be paired with semi-opaque and opaque liners for more control over sunlight.
For a more natural look that still blocks out light, try bamboo shades or grasses and reeds in woven woods. They add warmth and dimension to any room, while providing protection against harmful UV rays.
Another great option is cellular shades, which have an innovative honeycomb design that traps air for superior insulation. This helps keep your home regulated for more comfort throughout the year, and it may even save you money on your energy bill. Cellular shades come in a range of colors and styles to suit your interior décor, and many can be upgraded with a top down bottom up feature for enhanced privacy at night.
Blackout shades are essential in children’s rooms and nurseries, where maximum privacy is important for a good night’s sleep. They completely block out external light and noise for a tranquil sleeping environment. Many shades are designed with cordless operating systems that eliminate the risk of entanglement, and they come in a variety of patterns and colors to suit any room.
The Duolite option, available on Vignette(r) Roman shades, combines the light-diffusing capabilities of Silhouette(r) with the privacy of a room-darkening roller shade. This allows you to lower the front shade and adjust the opacity of the back shade to your exact preference, giving you full privacy during the day and gorgeous views out at night.
If you prefer the simple design of a roller shade, Nantucket(r) shades are a stylish yet cost-effective choice for privacy and light control. They use 3″ horizontal fabric vanes that rotate to filter and soften light, and they can be customized with a range of fabrics and colors.
Another great option is Designer Screen Shades, which provide privacy plus sun protection. They block out up to 75% of the sun’s rays, protecting your flooring, furniture and artwork from damage. They also help to reduce heat and cold loss in your home, and they can be customized with a wide range of materials, slat widths and finishes.
Energy Efficiency
Shades are designed to keep heat and cool air in your home during the winter, as well as block the sun’s harmful UV rays during the summer. These benefits make them an attractive option for homeowners looking to reduce their energy costs. However, not all shades are created equal when it comes to energy efficiency. The type of fabric, color, and weave determines the level of insulating value, with some fabrics performing better than others. Specialized cellular shades, also known as honeycomb shades, are the most efficient when it comes to keeping warm air in during the winter and blocking out solar heat. These insulated window treatments can reduce heat loss by 40% and lower your energy bills by 10% during the heating season.
Cellular shades work by insulating your windows with small, hexagonal-shaped cells that trap air and provide insulation. The size of these cells affects the insulating quality, with larger pleat sizes providing more insulation than smaller ones. Additionally, the number of layers within each cell impacts your shade’s R-value. The higher the R-value, the more effective the shade.
In addition to R-value, the amount of light that filters through your shades depends on the opacity of the fabric. A shade’s opacity is measured by its openness percentage, with higher numbers allowing more visibility and lower numbers blocking more light.
The opacity of your shades is important because it determines how much natural light and privacy you’ll have in your home. A shade with a low openness percentage is perfect for bedrooms, living rooms, and other areas where you want to maintain a high degree of privacy. A shade with a high openness percentage, on the other hand, is perfect for kitchens, bathrooms, and other areas where you don’t need privacy but still want to let in lots of sunlight.
The word “shade” means partial darkness, as well as something less bright than its surroundings. The term may also refer to a dark figure cast upon a surface by an object intercepting sunlight: the shade of the tree. It is also the name of a beer and wine vault at Brighton, England, as well as a U.S. slang word for something that affords protection from light, heat, or weather.
Customization
Shades offer a wide range of customization options that allow you to tailor your window treatments to fit your aesthetic and functional preferences. For example, you can choose different opacities for roller shades, solar shades, and cellular shades to let in varying amounts of light or blackout your space. And you can also customize the design of your Roman or Sheer shades by choosing the fabric, color, and fold style.
With the addition of smart motorization, you can even program your shades to open and adjust automatically at set times throughout the day and night. For more information about the customization options available for shades, schedule a free design consultation today.
To shade means to introduce degrees of darkness into (a drawing or painting) to render light and shadow and give the appearance of depth. The architect shaded the skyline to make it appear more three-dimensional. In other words, it was a way to soften the sharp contrast between light and dark in the city’s celebrated buildings. To throw shade at someone means to criticize them in a hurtful or derogatory way.