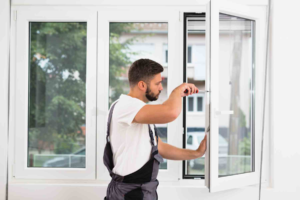
Drywall Installation Las Vegas is an important part of interior construction. However, it can also present challenges.
Material costs can be a major factor in project budgets. Drywall boards, tape, joint compound, and other materials add up quickly.
When possible, plan to hang drywall panels horizontally to minimize the number of seams. If you must install a panel vertically, sit it halfway over the top of a stud to prevent sagging.
Prepare the Surfaces
Drywall is a popular building material, especially for walls and ceilings. It’s affordable, quick to install and easy to repair if needed. Drywall also adds insulation to homes and offices, which cuts down on energy costs. Plus, it’s fire-resistant, making it safer for occupants in case of a fire. But, despite its usefulness, drywall isn’t without its drawbacks. Some people find it to be sterile and lacks character, while others dislike the hollow thump that results when you knock on a wall built with drywall.
Drywall, or wallboard, is a sheet of high-grade calcium sulfate dihydrate (gypsum) sandwiched between sheets of face and back paper. The gypsum is mixed with additives including fiber-glass, paper, and plasticizer; foaming agent; and other ingredients that reduce mildew, flammability, and water absorption. The paper used on each side of the gypsum varies by type and thickness, which determines the overall product.
Some drywall is made with recycled paper and other materials, which makes it more environmentally friendly. Some manufacturers even take back waste wallboard from construction sites for recycling into new product.
Before you can start working with drywall, make sure the work area is clean and organized. It’s a good idea to lay out each drywall sheet before you begin to prepare it for installation, or at least mark where you need to cut it with pencil and a T-square. Then, use a drywall saw to cut the sheets along your marks. If you’re tackling a large project, it may be worth renting a drywall saw or hiring an experienced contractor to do the cutting for you.
It’s also important to remember that drywall is heavy, and it may require special equipment or more than one person to handle the task of hanging each sheet. Additionally, drywall dust can be dangerous to your health, so you’ll want to protect yourself with safety gear and proper ventilation. Lastly, it’s a good idea to consult your local building codes and homeowners associations before beginning any drywall project. They can provide you with all the information and regulations you’ll need for safe and successful drywall installation.
Measure the Walls and Ceilings
As the saying goes, “measure twice, cut once.” That’s especially important with drywall, where mistakes can be costly. To avoid them, you should lay out each drywall sheet on a flat surface and mark where it will need to be cut with a pencil and a T-square or other straightedge tool. Then use a drywall saw to cut the pieces, either before starting the project or as you work. The latter method results in less waste but may take longer. If you’ll be cutting around electrical outlets and light switches, consider using a keyhole saw or circle cutter.
Once you’ve measured the walls and ceilings, you can calculate how many drywall sheets you’ll need to finish your project. The number will depend on the length and width of each wall and the size of the door or window openings. To get the number, add up the square footage of each wall and then multiply it by 2. Then divide this total by the square footage of a single drywall sheet (32 for 4′ x 8′ sheets) to get the number of sheets you need.
When you’re ready to start hanging drywall, make sure your workspace is clean and free of debris to avoid accidents and miscalculations. Renting a drywall lift or getting a friend to help you is also a good idea, as drywall is heavy and cumbersome to handle on your own.
As you work, be sure to regularly check your work and the fit of the drywall panels. Bulges or bumps can indicate problems with the framing that need to be addressed. In addition, ensuring that all panels are secure and level can prevent movement and cracks over time.
If you’re not comfortable working on a home improvement project like this, hire a professional to complete the drywall installation for you. When choosing a contractor, ask friends and family for recommendations and compare quotes. Make sure the contractor has enough experience and a good track record. Also, meet with the contractor to discuss the job and identify any potential personality conflicts that might impact the process.
Cut the Sheets
Drywall installation requires the use of heavy tools and large sheets. If you are doing the job alone, rent a drywall lift or ask a friend to help. It is also a good idea to walk through the steps of the project more than once, as this will improve your understanding and efficiency.
To start, lay out a sheet of drywall and mark with a pencil where you will need to cut it. This can be done in advance to prepare the material, or as you work (the latter method is typically quicker). A drywall saw is typically used to make cuts, and it is important to wear a dust mask to protect yourself. A keyhole saw is useful for cutting holes for outlets or light switches, and a circle cutter may be necessary for curved spaces.
It’s essential to cut blocking into walls and ceiling joists before drywall is hung, as this adds extra support for heavy objects and helps keep the drywall from buckling or warping. It’s also a good time to install electrical outlets, switches, and wiring. It’s generally recommended to consult with a licensed electrician at this point.
When you’re ready to cut the first sheet, use a straightedge and a T-square to create a line across the drywall where you will need to cut. A utility knife can then be used to score the drywall along the marked line, snapping it at that point with a sharp snapping motion. This process can be repeated for any other cuts you will need to make.
Once the drywall is in place, you will need to apply several layers of joint compound to the surfaces. This is a thick material that covers the seams, repairs any screw holes or defects in the surface of the drywall, and can be sanded down to a smooth finish. For a cleaner look, many people choose to skip this step and just paint the wall instead of using sandpaper.
Once the joints are filled and sanded, they can be taped over to conceal the edges of the drywall. After the tape is in place, a second layer of joint compound is applied to cover the tape and fill any gaps. This layer should be smooth and thin, and the resulting surface will be ready for painting.
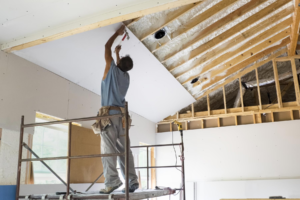
Hang the Sheets
Working with drywall is heavy work and requires some finesse, but it’s a project most DIYers can take on. It’s usually less expensive than hiring a professional, and the satisfaction of completing a room yourself can be just as rewarding. To save yourself some pain and frustration, follow these tips for a smooth drywall installation.
Before you start hanging any sheets, make sure the power is turned off at the electrical box. If you’re not completely comfortable with working on an electrical project, it’s a good idea to hire a licensed electrician to do the work for you.
Purchase a few large sheets of 4×8 1/2 inch wallboard in the lightweight variety, rather than heavier 4×12 inch sheets. This will significantly reduce the weight you’ll need to hoist on a ladder or scaffolding and will help protect your back. When lifting the sheets overhead, use a “crutch” made of 2x2s to support the lion’s share of the weight.
When you’re ready to hang a sheet, mark the locations of all studs with a pencil on both sides of the panel. This will make it easier to locate studs as you work, especially if you’re hanging the sheet alone. You don’t have to mark every stud, but a few main ones and the locations of any window or door openings will be helpful.
Sit the end of each drywall panel halfway over a stud. This provides extra support for the panel and helps prevent cracks along the joint.
Continue hanging your drywall panels, taking care not to place seams over any doors or windows. For doors and windows, cut a notch out of the drywall sheet with a utility knife and install a drywall corner bead over the hole to provide additional strength.
Once you’re finished hanging the drywall, run your putty knife gently over all the edges to make sure none of the screws or nails stick out beyond the edge of the paper. If they do, screw them in a bit more with a drill or screwdriver, being careful not to break the paper.